
Case Study: Chemistry for Liberal Studies
How do you make chemistry more appealing to Liberal Studies students?
This was the challenge faced by Dr Stephanie Dillon, the Director of Freshman Chemistry Laboratories at Florida State University. Dr Dillon wanted to attract more Liberal Studies students to her introductory course in chemistry, which had been experiencing a steady drop in numbers over several years.
Working with Dr Dillon, CNDG designed a series of lectures, labs and assignments (including reading and examination materials), presented through the “Liberal Studies Chemistry: A Forensic Academy” VLE Program. The course, which asks students to take on the role of a junior forensic scientist in order to solve a case based on a real Tallahassee murder, increased enrolment by nearly 250% in the first year.
Project Title: Chemistry for Liberal Studies – A Forensic Academy.
Client: Dr Stephanie Dillon
Director of Freshman Chemistry Laboratories, Florida State University.
Objective: to increase enrollment.
Summary: students take on the role of a junior forensic scientist to solve a murder based on a real case. Ten modules allow students to familiarise themselves with the analytical machines and safety equipment used in real laboratories, practice core lab skills, and test their theoretical knowledge. The course is a complete package including both lecture and lab elements.
Outcome: since Fall 2016 and Fall 2017, enrollment increased from 86 to 299 students. It currently stands at 800 students per year.
The virtual world is very cool to work in. (The students)… have a really great time and we sneak a little bit of chemistry in with everything else. We’re still looking at scientific method, and we hold them to a really high standard, but they have such fun doing it, they don’t even know that they’re being taught.
Videos for all our courses are available on on our YouTube channel.
Modules
The course comprises the following modules:
1. Intro, including lab safety
2. Gathering evidence
3. Chemical basics
4. Chemical structure
5. Chemical evidence: solutions
6. Chemical evidence: drugs
7. Arson and the Chemistry of Fire
8. Time of death
9. Weapons and Chemistry
10. The Biochemistry of Poisons
11. Identifying the suspect: part 1
12. Identifying the suspect: part 2

Design
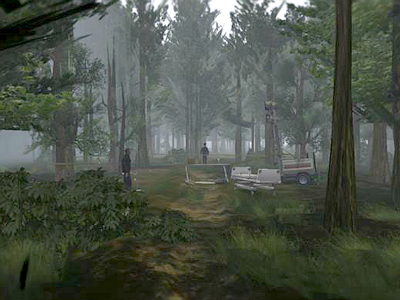
The course requires students to take on the role of a junior forensic scientist in order to solve a case based on a real Tallahassee murder in the fictional town of Cloudsville. Much of the evidence students analyze in the modules is based on evidence collected during the actual murder investigation. The final module requires students to read transcripts of witness and suspect interviews from the Tallahassee investigation. Because these statements often contradict the forensic evidence, students must use what they have learned to decide whether the evidence supports an arrest.
The VLE comprises three streets in a fictional town (“Cloudsville”), including a police station and garage, a cinema, a forensics laboratory with an autopsy room, evidence locker and offices, and various high street shops and cafes, as well as a recreation of the section of forest where the crime took place. Students navigate the environment via a Heads-Up Display (“HUD”), and interact with “robot avatars” playing the parts of a police officer, a pathologist, suspects, witnesses, and a forensic scientist.
Modules
1: Introduction to the Facility and Lab Safety
Students are taken on a tour of Cloudsville, the town in which the modules are set. They meet key non-player characters and are introduced to the virtual laboratory, where they receive instruction on the basic rules of lab safety, including the use of lab safety equipment.
2: Tools of the Trade
In the virtual lab, students are familiarized (via a Heads-Up Display) with techniques and equipment commonly used in chemistry laboratories to measure density, mass, volume and concentration. They use and explore common lab glassware and techniques, an analytical balance, centrifuge, microscope, and UV-Vis spectrometer.
3: A Gruesome Crime
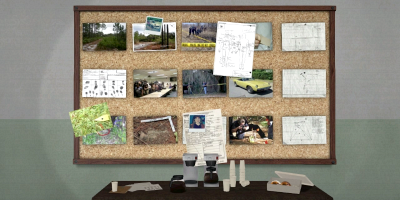
Students visit a crime scene in a forest clearing outside Cloudsville, where they collect all evidence present using safe techniques and the proper storage containers for different kinds of evidence. The speed at which they collect evidence is controlled in order to prevent them rushing through the process. For example, if they attempt to pour a cast or remove the cables used to tie the body too quickly, the system resets and they must start again.
4: Lab Rat
Students sit in at an autopsy in the virtual lab, then conduct experimental analysis on debris found at the crime scene to determine if an accelerant was used to start fires. Students complete a charcoal extraction followed by GC Mass spectrometry to determine the presence and identity of the accelerant. The module teaches them to prepare chemical solutions and explains the basic principles of gas chromatography and mass spectrometry.
5: Invisible Prints
In a police station garage, students use Luminol to swab the victim’s car for blood and collect evidence which they analyze in the lab. The module introduces them to the proper use of Ninhydrin spray and Superglue fuming to develop prints on the materials collected. The students are asked to determine the owners of the prints, if possible.
6: Toxicology is In
Students screen the blood samples for toxic substances such as barbiturates or heavy metals, using liquid-liquid extraction, followed by LC Mass spectrometry for analysis. Students are shown typical spectra and asked to identify the blood’s drug content by comparison; they use Reinsch screening to search for heavy metals in the blood.
7: Blood Types
In this module, students are guided through the process of preparing blood samples for later analysis. This delay in completing the process is deliberate, so students understand that not all processes can be completed in one sitting. The module’s second part involves the Fourier Transform Infrared Spectroscopy analysis of fibers found on the victim’s clothing and car. The goal is to see if there are matching fibers that provide evidence to place the victim in the trunk of the car.
8: DNA
Students receive samples from a suspect and run DNA analysis to match blood and semen samples from the victim at autopsy to the possible suspect, alongside a reference sample from the husband. They prepare both samples, run a Polymerase Chain Reaction and then initiate a Short Tandem Repeat analysis to match the samples. Again, the final processing and results are given in a later lab to demonstrate the time demands of real processing.
9: Conclusions
In the last module, students complete the analysis of the blood and DNA samples prepared in Module 7. They are shown slides of the the prepared blood samples under a microscope and given instructions on how to determine blood type from coagulation results. The DNA samples previously prepared are now given as STR DNA fingerprints for comparison. This completes the work conducted in the virtual environment.
In the final post-lab exercise, students use all they have learned from the laboratory experiments, combined with witness and suspect statements, to determine whether they think there is enough evidence to take the case to the District Attorney.
Outcome
The project has proven to be a great success. In 2012, approximately 20 students per semester were enrolled on Dr Dillon’s course — today, there are almost 750 students taking the course annually, and it continues to grow. What’s more, early indications show that their understanding and retention of the material has also increased.
CONTACT US
hello@cndg.info
Tel (US): +1 (855) 553 8726
Tel (UK): +44 (0) 207 193 2412
my.cndg
client support: help@cndg.info
© Chant Newall Development Group, LLC. All rights reserved. CNDG™ is a registered trademark of Chant Newall Development Group, LLC.